A leaking faucet can be more than just a minor annoyance. Over time, those tiny drips can add up to gallons of wasted water, which affects your utility bills and the environment. Fixing a leaking faucet is a simple task that most homeowners can tackle themselves with a bit of guidance and the right tools. Understanding the basics of faucet repair not only saves you money but also gives you the satisfaction of solving the problem independently.
In this article, we will guide you through diagnosing the source of the leak, gathering the necessary tools and materials, and fixing the issue step-by-step. We’ll also provide some preventive maintenance tips to help keep your faucets in excellent working condition and avoid future leaks. Whether your faucet is leaking from the spout, the handle, or underneath, we’ll cover the solutions you need to get it back to tip-top shape. So, let’s dive in and tackle that pesky leak once and for all.
Identifying the Source of the Leak
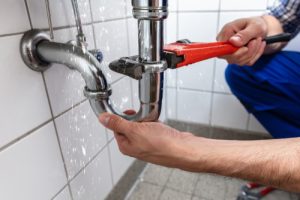
Diagnosing where the leak is coming from is the first step to fixing a leaky faucet. Start by observing the faucet closely. Is the leak coming from the spout, the base, or the handles? Watch the faucet after it’s turned off to see where the water is dripping. Sometimes, running water will help reveal leaks that aren’t obvious when the faucet isn’t in use.
Common places where faucets leak include the handle, the spout, and underneath the sink, where the faucet connects to the plumbing. The handle may leak when it’s turned on or off, indicating an issue with the O-ring or valve. If the spout is leaking, it often means the washer needs replacing. Leaks underneath the sink can suggest problems with the plumbing connections or the faucet itself. Identifying the exact spot can help you figure out the necessary repairs.
Required Tools and Materials
Before you start the repair, gather all the tools and materials you’ll need. Having everything on hand will make the process smoother and quicker. Here’s a list of tools you will likely need:
- Adjustable wrench: To tighten or loosen nuts and bolts.
- Screwdrivers (Phillips and flat-head): For removing screws from the faucet.
- Pliers: To grip and turn various parts.
- Penetrating oil: To loosen any rusted parts.
- Plumber’s tape: For sealing connections to prevent leaks.
- Replacement parts: These could be washers, O-rings, or cartridges, depending on your faucet type.
Common materials you might need to replace include washers, O-rings, valve seats, and cartridges. Identifying the brand and model of your faucet beforehand can help you get the right parts. Taking the old part to the store can also ensure you get the correct replacement. Being prepared with the necessary tools and parts will help you fix the leak efficiently, reducing the risk of complications.
Step-by-Step Guide to Fix the Leak
Once you’ve identified the leak and gathered your tools and materials, it’s time to start the repair. Follow these steps to fix the most common faucet problems:
- Turn off the Water Supply: Before you begin any repair, make sure to turn off the water supply to avoid any mess. You can usually find the shut-off valves under the sink.
- Disassemble the Faucet: Use the screwdriver to remove the handle. Then, take out any screws or bolts holding the faucet parts together.
- Inspect and Replace Damaged Parts: Look at the O-rings, washers, and valve seats. If they are worn out or damaged, replace them with the new parts you have bought.
- Reassemble the Faucet: Once you have replaced the necessary parts, carefully put the faucet back together. Make sure each part is secured tightly to prevent new leaks.
- Test the Faucet: Turn the water supply back on and test the faucet by turning it on and off a few times. Check for any leaks around the new parts and make adjustments if necessary.
Avoid common mistakes like over-tightening screws or parts, which can cause damage. Following these steps methodically ensures the leak is properly fixed and helps the faucet function smoothly.
Preventive Maintenance Tips for Avoiding Future Leaks
Preventing future leaks is all about regular maintenance and quick action. Here are some best practices for keeping your faucet in top condition:
- Regularly Inspect and Clean: Periodically check your faucet and the area around it for signs of wear or grime buildup. Clean it regularly to prevent dirt and mineral deposits, which can wear down components.
- Replace Worn Parts Promptly: If you notice any parts starting to wear out, replace them as soon as possible. Delaying repairs can lead to more significant issues and costly fixes.
- Use a Soft Cloth for Cleaning: When cleaning your faucet, use a soft cloth and mild soap. Avoid abrasive cleaners and scrubbers that can damage the finish and components.
- Check Water Pressure: High water pressure can put stress on your faucet, causing leaks. If you notice unusually high pressure, consider installing a pressure regulator.
Performing simple DIY checks and routine maintenance helps avoid bigger problems down the road. By staying proactive, you ensure your faucet stays in great shape, saving you time and money on major repairs.
Conclusion
Fixing a leaking faucet does not have to be a daunting task. With the right tools, a bit of patience, and a straightforward approach, most homeowners can tackle this common plumbing issue themselves. Identifying the source of the leak and knowing which parts to replace are crucial steps in the process. Maintaining your faucet through regular checks and cleaning can prevent future leaks, keeping your home’s plumbing in excellent condition.
At Pulliam Plumbing, we understand the importance of having a fully functional plumbing system. Whether you need assistance with a tricky leak or want to ensure your plumbing remains in top shape, our team is here to help. Reach out to us today for expert advice and quality plumbing services.