Installing a new shower can transform your bathroom into a more functional and aesthetically pleasing space. Whether you’re upgrading an outdated fixture or adding a brand-new shower, understanding the installation process is key to achieving the best results. A proper installation ensures not only beautiful results but also long-term functionality.
Before diving into the project, it’s important to prepare appropriately. This involves assessing your bathroom space, ensuring you have the necessary tools, and understanding the steps involved in the installation process. With a bit of planning and attention to detail, even complicated installations can proceed smoothly.
Choosing the right shower and setting it up doesn’t have to be overwhelming. This guide aims to simplify the process, offering clear steps to follow for a successful installation. Whether you’re a seasoned DIY enthusiast or new to home improvement, these step-by-step instructions will help you confidently tackle your shower installation project.
Preparing Your Bathroom for Installation
Before installing a new shower, it’s crucial to get your bathroom ready. Start by removing the old shower if you have one. Wear protective gear and turn off the water supply. Carefully detach plumbing connections to avoid damaging pipes. Once the old fixture is out, inspect the area for any signs of water damage or mold. Address these issues immediately to prevent problems down the line.
Next, check your bathroom’s layout. Ensure there is enough space to accommodate your new shower. Take precise measurements, considering both the shower and its surrounding area. Your new shower should fit comfortably, allowing for easy movement and accessibility.
Consider ventilation. Proper airflow reduces moisture and prevents mold growth. If your bathroom lacks windows, contemplate installing an exhaust fan or another form of ventilation to maintain air quality. Mark any areas requiring adjustments, such as new plumbing lines or electrical outlets, and prepare to make these changes before the installation begins.
Assess your plumbing system to confirm it’s capable of handling the new shower’s requirements. Check existing pipes for wear and replace any that are old or leaky. A plumber can help if you’re unsure about making significant changes or upgrades to your existing setup.
Gathering the Necessary Tools and Materials
Having the right tools and materials on hand is essential for a smooth shower installation. Start by making a list of what you need. This may include tools like a screwdriver set, adjustable wrench, tape measure, hacksaw, and level. If installing tile or panels, add a trowel and grout float to your list.
Materials will vary based on your shower type. Common items include fixtures like the shower head and handle, plus pipes, valves, and connectors. You might need waterproof wall panels, a shower pan, or floor tiles, depending on the style you choose. Purchase quality materials to ensure longevity and performance.
For waterproofing, gather sealants and waterproof membranes. These protect against leaks and are vital in keeping moisture out of walls and subfloors. Also, have a supply of plumber’s tape and caulking for sealing joints and connections.
If your installation requires modifying existing plumbing or moving the shower’s location, you may need additional supplies like new pipes or fittings. Plan these changes in advance to avoid interruptions during installation. Having everything ready reduces stress and ensures your project progresses without unnecessary delays.
Step-by-Step Shower Installation Process
With your bathroom prepared and materials ready, start the installation process by assembling the shower base. Position it carefully and ensure it’s level, using shims if needed to adjust its position. Secure it following the manufacturer’s instructions, then connect the drain to prevent leaks.
Next, install the shower walls or panels. Begin by applying a waterproof membrane if needed, then affix the panels securely. Align them correctly to prevent gaps or misplacement. Use screws or adhesives as indicated by your specific installation guide. For tiled showers, apply tiles with a thin layer of adhesive, taking care to space them evenly and fill gaps with grout once the tiles set.
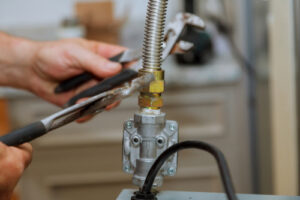
Now, attach the plumbing fixtures. Carefully position the showerhead and control valves, hooking them up to the designated water lines. Use plumber’s tape to seal threaded connections and prevent leaks. Make sure each connection is tight but not overly so, as this could damage fittings.
Inspect the work frequently to confirm all components are installed correctly. Check that all waterproof surfaces and seals are in place. If your shower includes a door or curtain rod, install this last, aligning it properly for smooth operation.
Final Checks and Ensuring Proper Functionality
After installation, perform thorough checks to ensure everything works properly. Turn on the water supply and test all plumbing joints for any sign of leaks. Pay close attention to the showerhead, valves, and drain to ensure water flows as expected.
Verify that water drains away efficiently and there is no pooling around the shower base. Adjust the slope of the floor or base if you notice water accumulation. Ensure all caulking and sealants are applied neatly and check their effectiveness in preventing moisture intrusion.
Operate the shower controls to test usability and comfort. Make sure hot and cold settings are accurate, and adjust the water pressure if necessary. Test the door or curtain to confirm it opens and closes smoothly without obstructions.
Completing these final steps ensures your new shower provides reliable service. Double-check for any overlooked spots, re-tighten necessary connections, and give a final polish to all visible components. A well-functioning shower enhances your bathroom and provides everyday convenience.
Conclusion
Upgrading your bathroom with a new shower involves careful planning and execution. From preparing the space to ensuring everything is installed correctly, attention to detail makes a significant difference. By following the outlined steps, homeowners can enjoy a successful installation. Such a project not only improves home value but also enhances daily living.
Ready to tackle your shower installation with confidence? At Pulliam Plumbing, our plumbers in Boerne, TX, offer expert advice and services to bring your bathroom vision to life. Whether you need a hand with the installation or expert plumbing solutions, reach out to us. Discover why Boerne and Fair Oaks, Texas, residents trust Pulliam Plumbing to deliver top-tier plumbing services.